Thursday, September 3, 2026

How to Create a New User and Enable the Login Screen in Ubuntu

If your Xubuntu virtual machine boots directly to the desktop without showing a login screen, automatic login is probably enabled.

This guide shows how to create a new user called user1, set a password for the account, and disable automatic login so that Xubuntu displays the login screen whenever the VM starts.

Creating a New User in Xubuntu

1. Create the User

Open a Terminal and run:

sudo adduser user1

Follow the prompts to create the account. You will be asked to enter a password and some optional information about the user.

You can press Enter to skip optional information such as the full name, room number, and phone number.

2. Set or Change the Password for user1

If you need to set a password for user1 later, or simply want to change the existing password, run:

sudo passwd user1

You should see prompts similar to:

New password:
Retype new password:
passwd: password updated successfully

When entering a password in the Linux Terminal, nothing will appear on the screen. You will not see characters, dots, or asterisks while typing. This is normal behavior.

3. Give user1 Sudo Privileges (Optional)

By default, the new account does not necessarily have administrative privileges. If you want user1 to be able to execute commands using sudo, run:

sudo usermod -aG sudo user1

This step is optional. If user1 should remain a normal user without administrator privileges, you can skip it.

Enabling the Xubuntu Login Screen

4. Check the Display Manager

Xubuntu commonly uses LightDM to provide its graphical login screen. You can check which display manager is currently configured by running:

cat /etc/X11/default-display-manager

On a typical Xubuntu installation, the output should be:

/usr/sbin/lightdm

If you see /usr/sbin/lightdm, the following LightDM configuration steps apply to your system.

5. Check Whether Automatic Login Is Enabled

Search the LightDM configuration files for settings related to automatic login:

grep -R "autologin" /etc/lightdm/

You may find configuration similar to:

[Seat:*]
autologin-user=myuser
autologin-user-timeout=0

The important setting is:

autologin-user=myuser

This tells LightDM to automatically log in to the specified account instead of displaying the normal graphical login screen.

6. Disable Automatic Login

If the automatic-login configuration is located in /etc/lightdm/lightdm.conf, open the file using Nano:

sudo nano /etc/lightdm/lightdm.conf

Look for configuration similar to:

[Seat:*]
autologin-user=myuser
autologin-user-timeout=0

Comment out the automatic-login lines:

[Seat:*]
#autologin-user=myuser
#autologin-user-timeout=0

Alternatively, you can remove the automatic-login lines completely.

If the earlier grep command shows that the settings are stored in another file under /etc/lightdm/, edit that file instead.

When using Nano:

  • Press Ctrl+O to save the file.
  • Press Enter to confirm the filename.
  • Press Ctrl+X to exit Nano.

Testing the New User Account

7. Test user1 from the Terminal

Before rebooting the virtual machine, you can verify that the new account and password work correctly. Run:

su - user1

Enter the password that you configured for user1.

If authentication succeeds, the shell will switch to the new user's environment. You can verify the current username with:

whoami

The output should be:

user1

To return to your original account, run:

exit

Rebooting and Verifying the Login Screen

8. Reboot Xubuntu

After creating the user and disabling automatic login, reboot the virtual machine:

sudo reboot

When Xubuntu starts again, LightDM should display the graphical login screen instead of automatically opening the desktop.

You should now be able to select your existing account or user1 and log in using the corresponding password.

Quick Command Reference

# Create a new user
sudo adduser user1

# Set or change the user's password
sudo passwd user1

# Optional: give user1 sudo privileges
sudo usermod -aG sudo user1

# Check the current display manager
cat /etc/X11/default-display-manager

# Find LightDM automatic-login settings
grep -R "autologin" /etc/lightdm/

# Edit the main LightDM configuration
sudo nano /etc/lightdm/lightdm.conf

# Test the new account
su - user1

# Check the current username
whoami

# Reboot Xubuntu
sudo reboot

Conclusion

If Xubuntu boots directly to the desktop, automatic login is usually enabled in the display manager. Creating another user alone does not necessarily cause the login screen to appear.

After creating user1, setting its password, and disabling the autologin-user option in LightDM, the graphical login screen should appear whenever Xubuntu starts. You can then choose which account to use each time the virtual machine boots.

Read More

⚠️ Security Warning: Royal Cat (CAT) Crypto Token

Security Notice: Users who unexpectedly receive a cryptocurrency token named Royal Cat (CAT) should exercise caution.

An unfamiliar token appearing in your cryptocurrency wallet does not necessarily mean your wallet has been compromised, nor does it automatically prove that the token itself is fraudulent. However, unsolicited crypto tokens can sometimes be distributed as spam or used to encourage recipients to interact with suspicious websites, applications, or smart contracts.


⚠️ Why Royal Cat May Be Flagged as Suspicious

There can be multiple cryptocurrency assets using names such as Royal Cat and the ticker CAT. Cryptocurrency names and ticker symbols are not unique, which means the name alone cannot establish whether a particular token is legitimate.

You should be especially cautious if:

  • You never purchased or requested the Royal Cat token.
  • The token suddenly appeared in your wallet.
  • You do not recognize the sender or project.
  • The token directs you to an unfamiliar website.
  • You are asked to connect your wallet to claim, unlock, swap, or sell the token.
  • You are asked to approve an unfamiliar smart contract.
  • You are asked to sign a transaction you do not understand.
  • The token displays an apparent value but has unclear or unreliable liquidity.

🛡️ What Should You Do?

If an unknown Royal Cat token appears in your wallet, do not interact with it until you have independently verified its exact blockchain network and contract address.

As a precaution, avoid:

  • Clicking links promoted by the token.
  • Connecting your wallet to unfamiliar websites.
  • Approving unknown smart contracts.
  • Signing unexplained transactions or messages.
  • Entering your recovery phrase or private key on any website.

Important: Simply seeing an unsolicited token in your wallet generally does not require you to move your other cryptocurrency.

The greater risk can arise when a recipient is persuaded to interact with a malicious website, signature request, token approval, or smart contract.


🚨 Consider Reporting Royal Cat as Spam

If your wallet or cryptocurrency application provides a Report Spam, Mark as Spam, or Hide option, consider using it when Royal Cat appeared without your request or otherwise seems suspicious.

Reporting an unsolicited asset can help remove unwanted tokens from your wallet interface and may provide the platform with useful signals about potentially unwanted token distributions.

Reporting a token as spam is a precautionary security measure. It does not, by itself, establish that the token or its creators are fraudulent.


🔍 Check the Contract Address — Not Just the Name

Never identify a cryptocurrency solely by its name or ticker symbol.

Different smart contracts can use identical or very similar names such as Royal Cat or CAT. A legitimate project and an unrelated suspicious token could therefore appear to have the same name.

Before interacting with an unfamiliar cryptocurrency, verify:

  • The complete contract address.
  • The blockchain network where the token was issued.
  • Whether the contract source code is verified.
  • Whether the project's official sources identify the same contract.
  • Whether meaningful trading liquidity actually exists.
  • Whether reputable security services have identified contract risks.

🔐 Never Share Your Recovery Phrase

No legitimate token claim, wallet-support representative, exchange employee, or cryptocurrency project should require you to disclose your wallet's seed phrase, recovery phrase, or private key.

If a website associated with Royal Cat—or any other unexpected token—asks for this information, leave the website immediately.

Your recovery phrase can provide complete control over your wallet. Anyone who obtains it may be able to transfer your cryptocurrency without your permission.


✅ Recommended Action

⚠️ SECURITY RECOMMENDATION

If you did not intentionally acquire Royal Cat (CAT), avoid interacting with it, do not follow links associated with it, and consider reporting or hiding the token as spam until its exact contract can be independently verified.

Final Thoughts

Unexpected cryptocurrency should not automatically be treated as free money.

Receiving an unknown token can simply be unwanted blockchain spam, but unsolicited assets may also be designed to attract attention and encourage risky interactions.

The safest approach is simple: do not trust an unexpected token based on its name, displayed balance, or apparent value. Verify the contract independently before interacting with it.

When in doubt: don't click, don't connect, don't approve, and don't sign.


Disclaimer: This article is provided for general cybersecurity and educational purposes only. References to Royal Cat (CAT) describe precautions users may take when encountering an unsolicited or unverified token. The appearance of a token in a wallet, or reporting it as spam, does not by itself establish fraud or wrongdoing by any person or project. This article is not financial, investment, or legal advice.

Read More

Windows Partition Merge & WinRE Recovery Notes

Windows Partition Merge & WinRE Recovery Notes

This note documents the successful process used to merge the space from the old E: partition into C: while preserving and rebuilding the Windows Recovery Environment (WinRE).

Important: Partition operations can cause data loss if the wrong disk or partition is selected. Always verify partition numbers, sizes, and contents before deleting or changing anything.

Introduction: Why Windows Partition Merge Is Needed

Over time, a Windows disk can become inefficiently divided into multiple partitions. A common situation is that the system partition (C:) becomes nearly full while another partition, such as D: or E:, still has a large amount of unused space. A full C: drive can interfere with Windows updates, application installations, temporary files, virtual memory, and normal system operation.

In this case, the disk originally contained a relatively small C: partition of about 14 GB and a much larger E: partition of about 185 GB. Since the additional E: partition was no longer needed, the objective was to return its space to C: and create one much larger, more practical system partition.

Normally, this can be accomplished by deleting the unnecessary partition and extending C: into the resulting unallocated space. However, Windows can extend a partition only when the unallocated space is directly adjacent to the right side of that partition.

The original physical layout was:

[EFI] [MSR] [C:] [Recovery] [E:]

After E: was deallocated, the layout became:

[EFI] [MSR] [C:] [Recovery] [Unallocated Space]

The Windows Recovery Environment (WinRE) partition was therefore positioned between C: and the newly available space. Windows Disk Management cannot move this Recovery partition, so C: could not simply be extended into the large unallocated area.

The solution was to back up the existing WinRE files, remove the obstructing Recovery partition, extend C: into the available space, and then create a new Recovery partition at the end of the disk and restore WinRE.

The overall objective was:

BEFORE
[EFI] [MSR] [C: ~14 GB] [Recovery] [E: ~185 GB]

AFTER
[EFI] [MSR] [C: ~199 GB] [Recovery ~1 GB]

This arrangement gives the Windows system partition substantially more usable space while preserving the EFI boot partition, Microsoft Reserved partition, and a functional Windows Recovery Environment.

1. Original Layout

[EFI 100 MB] [MSR 16 MB] [C: ~14 GB] [Recovery 593 MB] [E: ~185 GB]

After E: was deallocated:

[EFI] [MSR] [C:] [Recovery 593 MB] [~185 GB Unallocated]

The 593 MB Recovery partition prevented C: from being extended because Windows requires unallocated space to be directly adjacent to the right side of C:.

2. Identify the Active WinRE Partition

reagentc /info

The important result was:

Windows RE status: Enabled
Windows RE location:
\\?\GLOBALROOT\device\harddisk0\partition4\Recovery\WindowsRE

DiskPart was used to confirm the partition:

diskpart
select disk 0
list partition

Partition 4 was confirmed as the 593 MB Recovery partition.

3. Mount the Existing Recovery Partition

diskpart
select disk 0
select partition 4
assign letter=R
exit

Verify the recovery files:

dir /a R:\Recovery\WindowsRE

The partition contained:

boot.sdi
ReAgent.xml
Winre.wim

Winre.wim was approximately 514 MB.

4. Back Up WinRE Before Deleting the Recovery Partition

Because C: initially had insufficient free space, a temporary partition was used to store the backup.

xcopy R:\Recovery\WindowsRE T:\WinRE_Backup\ /h /i /y

Verify hidden/system files with:

dir /a T:\WinRE_Backup
The /h option copies hidden and system files. A normal dir may report no files because these files retain their hidden/system attributes. Use dir /a.

5. Delete the Old Recovery Partition

First verify the partition carefully:

diskpart
select disk 0
select partition 4
detail partition

After confirming it was the 593 MB Recovery partition:

delete partition override

6. Make the Free Space Adjacent to C:

The temporary backup partition initially ended up between C: and the large unallocated region. The WinRE backup was therefore temporarily copied to C: after C: gained enough free space.

First extend C: into the immediately adjacent 593 MB:

diskpart
select volume C
extend
exit

Check free space:

fsutil volume diskfree C:

Copy the temporary WinRE backup to C:

mkdir C:\WinRE_Backup
xcopy T:\WinRE_Backup C:\WinRE_Backup\ /h /i /y
dir /a C:\WinRE_Backup

After verifying Winre.wim, delete the temporary T: partition:

diskpart
select volume T
detail volume
delete volume

7. Extend C: Across the Remaining Space

select volume C
extend
exit

C: grew from approximately 14 GB to approximately 199 GB.

8. Reserve About 1 GB for a New Recovery Partition

Shrink C: by 1 GB:

diskpart
select volume C
shrink desired=1024 minimum=1024

select disk 0
create partition primary
format quick fs=ntfs label="Windows RE tools"
assign letter=R
exit

The layout was now approximately:

[EFI] [MSR] [C: ~198.9 GB] [Windows RE tools ~1 GB]

9. Restore the WinRE Files

mkdir R:\Recovery
mkdir R:\Recovery\WindowsRE
xcopy C:\WinRE_Backup R:\Recovery\WindowsRE\ /h /i /y
dir /a R:\Recovery\WindowsRE

Verify that Winre.wim, boot.sdi, and ReAgent.xml are present.

10. Convert the New Partition to a Windows Recovery Partition

Verify the new ~1 GB partition number:

diskpart
select disk 0
list partition
select partition 4
detail partition

After confirming Partition 4 was the new 1023 MB Windows RE partition:

set id=de94bba4-06d1-4d40-a16a-bfd50179d6ac
gpt attributes=0x8000000000000001
exit

This changes the GPT partition type to the Windows Recovery partition type and applies the appropriate hidden/protected attributes.

11. Register and Enable WinRE

reagentc /setreimage /path R:\Recovery\WindowsRE
reagentc /enable
reagentc /info
Successful final result:
Windows RE status: Enabled
Windows RE location:
\\?\GLOBALROOT\device\harddisk0\partition4\Recovery\WindowsRE

12. Final Layout

[EFI 100 MB] [MSR 16 MB] [C: ~198.9 GB] [Recovery ~1 GB]
PartitionPurposeApprox. Size
EFIUEFI boot files100 MB
MSRMicrosoft Reserved Partition16 MB
C:Windows / main data partition~198.9 GB
RecoveryWindows Recovery Environment~1 GB

Final Cleanup

Before deleting the temporary backup, reboot Windows and verify:

reagentc /info

Confirm that WinRE remains Enabled and points to harddisk0\partition4\Recovery\WindowsRE.

After successful verification, the Recovery partition's temporary drive letter can be removed:

diskpart
select disk 0
select partition 4
remove letter=R
exit

Verify reagentc /info again. Only after WinRE remains enabled should the temporary backup be removed:

rmdir /s /q C:\WinRE_Backup
Key lesson: Drive letters such as P:, Q:, R:, or T: do not determine the physical position of a partition. DiskPart normally creates a new partition in available free space according to disk layout, so always check the graphical/physical partition order before relying on a temporary partition.
Read More

Saturday, July 18, 2026

Introduction To Software Testing

Purpose of software testing: A study of how errors, defects, and failures happen, and how we catch them to increase confidence in delivered software. Analogy (car delivery vs software delivery): In car manufacturing, expectations (no damage, correct parts, documentation, pre-sales checks) are treated as baseline requirements. Software delivery often fails to meet expectations—commonly because testing is inadequate. Testing challenges: Testing is not inherently “complex,” but it’s often applied with insufficient rigour, leading to an assurance vacuum. Common issues include: Rigour gap (not done thoroughly enough) Human cost (time/coordination effort) Tooling shortfall (underuse of technology that could speed up testing) Why software fails (five cases): Airbus A380: Wiring/cabling integration problems during assembly. UK tax returns: A privacy/data leakage issue where users could see prior users’ earnings. UK “Top 10 Wanted” website: Performance collapse due to load spikes after widespread publicity. Smartphone mapping app: Data accuracy/cartographic errors (e.g., incorrect placement of a museum). US military breach: Security breach exposing sensitive personnel financial and identity data. Root causes: Designers make mistakes because of pressures like deadlines, system complexity, organizational complexity, and changing technology. Error → defect → failure model: Error: incorrect thinking/assumption/forgotten detail (invisible) Defect: the error becomes a fault in documentation/specs/design/code Failure: the defect causes the system to fail (not always, but often) Detection pitfalls: Test outcomes can be misleading: False positive (looks broken, actually works) False negative (works “in tests,” but fails in real use because it wasn’t detected) How to handle testing: Start testing early (“begin testing the moment errors begin”) to prevent propagation. Continue until confident, right through to the end of development. What’s at stake: Incorrect software can cause money loss, time loss, reputation damage, injury, or even death—especially in safety-critical systems.


Software Engineering / Lecture 01 01 / 14

Introduction
to Software
Testing.

Why systems fail · How we catch them
A study of errors, defects & failures.
◉ EST. 2024 · DEPT. OF CS
The analogy · expectations 02 / 14
If you were buying a new car…

A level of expectation is set the moment you walk in.

You would not expect to take delivery from the showroom with a scratch down the side of the vehicle. The car should have the right number of wheels, a steering wheel, an engine — and a spare for emergencies.

It should come with appropriate documentation, with all pre-sales checks completed and passed satisfactorily. The car you receive should be the car described in the sales literature.

If your expectations are not met, you will feel justifiably aggrieved.
Bodywork integrityVISUAL
Wheels + spareCOMPONENT
Engine specificationPERFORMANCE
Colour scheme matchAESTHETIC
Ordered extrasCONFIG
Fuel consumptionMETRIC
DocumentationPAPERWORK
The contrast · delivery expectations 03 / 14
Car delivery test vs. Software delivery
Automotive

Pre-sales
checks
passed.

Brochures, test drives, experience — all set a baseline. Deviation is the exception, not the rule.

Expectation92%
versus
Software

Delivered
not working
— often.

Examples of software being delivered not working as expected, or not working at all, are common. No single cause, but inadequate testing is a major factor.

Confidence34%
The discipline · challenges 04 / 14
Software testing challenges

Software testing is neither complex nor difficult to implement, yet it is a discipline that is seldom applied with anything approaching the necessary rigour to provide confidence in delivered software.

It is costly in human effort, or in the technology that can multiply that effort — yet seldom implemented at a level that provides any assurance software will operate effectively, efficiently or even correctly.

01
Rigour gap. Seldom applied at the level needed to inspire confidence.
02
Human cost. Expensive in people, time, and coordination.
03
Tooling shortfall. Technology that multiplies effort is underused.
04
Assurance vacuum. Rarely does testing guarantee correct operation.
Why software fails · five cases 05 / 14
Case studies in software failure

Why does software fail?

Five real-world examples where inadequate testing or design flaws led to failures of varying scale — from financial loss to national security exposure.

CASE 01
Airbus
A380
Manufacturing
CASE 02
UK Tax
Returns
Privacy
CASE 03
Top 10
Wanted
Performance
CASE 04
Mapping
App
Accuracy
CASE 05
US Military
Breach
Security
Case 01 · Airbus A380 06 / 14
Case Study 01
01
Cabling could not be joined.

Assembly
incompatibility.

After successful test flights and airworthiness accreditation, problems arose in the manufacture of the Airbus A380 aircraft. Assembly of the large sub-parts into the completed aircraft revealed enormous cabling and wiring problems.

The wiring of large sub-parts could not be joined together. The issue was quickly fixed and the aircraft entered into service within 18 months of the cabling difficulties being identified.

Estimated rectification cost
$6.1BILLION
Case 02 · UK Government tax filing 07 / 14
Case Study 02
02
You could see what the previous user earned.

Privacy
breach.

When the UK Government introduced online filing of tax returns, a user could sometimes see the amount that a previous user earned.

This was regardless of the physical location of the two applicants — a session or data leakage defect with serious privacy implications for every citizen using the system.

Failure category
DATALEAKAGE
Case 03 · UK's top 10 wanted 08 / 14
Case Study 03
03
The site was taken offline.

Performance
collapse.

In November 2005, information on the UK's top 10 wanted criminals was displayed on a website. The publication was described in newspapers, on morning radio and television, and as a result many people attempted to access the site.

The performance of the website proved inadequate under this load and it had to be taken offline. The publicity created performance peaks beyond the capacity of the website.

Failure category
LOADSPIKE
Case 04 · Smartphone mapping app 09 / 14
Case Study 04
04
A museum sat in the middle of a river.

Cartographic
errors.

A new smartphone mapping application was introduced in September 2012. Among many other problems, a museum was incorrectly located in the middle of a river, and Sweden's second city, Gothenburg, seemed to have disappeared from at least one map.

A high-profile launch with low-quality data undermined user trust within hours.

Failure category
DATAACCURACY
Case 05 · US military security breach 10 / 14
Case Study 05
05
Perhaps "all" personnel compromised.

Personnel
exposure.

Security breaches at the US military resulted in the payment details of many personnel — perhaps even "all" — being compromised.

The exposed data included names, addresses, email addresses and bank details: the full financial identity of serving members of one of the world's most security-conscious organisations.

Failure category
SECURITYBREACH
Root cause · human fallibility 11 / 14
Do system designers make mistakes?

Of course they do. People are fallible.

To understand what's going on, we need to start at the beginning — with the people who design systems. Pressures bear down on designers and increase the likelihood of defects in specifications, designs and code.

P/01
Deadlines
P/02
System complexity
P/03
Organisational complexity
P/04
Changing technology
Anatomy · error → defect → failure 12 / 14
Error, Defect, Failure

From invisible thought to visible collapse.

STAGE / 01
Error
An incorrect thought, a wrong assumption, or a thing forgotten. Intangible — you cannot touch it. Where major system failures usually begin.
STAGE / 02
Defect
When the error is written down, it becomes a fault or defect in a document. If used to specify a component, the component may be built faulty.
STAGE / 03
Failure
A faulty component built into a system causes the system to fail. Not always guaranteed — but errors in thought tend to lead to faulty components, and faulty components cause system failure.
Detection · false signals & strategy 13 / 14
Not every apparent failure is a real failure

Test results can lie — in both directions.

False Positive
+

Looks broken.
Isn't.

The tester misunderstood what should happen in those precise circumstances. The application or system is actually performing correctly.

False Negative

Looks fine.
Isn't.

A real failure exists, but is not identified as such — the test is seen as correct, and the defect slips through into production.

AVOIDANCEBegin testing the moment errors begin — at the start of development. Find faults before they propagate.
RECTIFICATIONContinue until confident no serious failures remain — right through to the end of the development process.
Conclusion · what is at stake 14 / 14
Incorrect software can harm…

People. Companies.
The environment.

— LOSS / 01
Money
— LOSS / 02
Time
— LOSS / 03
Reputation
— LOSS / 04
Injury
— LOSS / 05
Death
A train carrying nuclear waste. An aircraft at altitude. A hospital life support system. Software failures can cause all of these at once.
Read More

Thursday, July 11, 2024

Linear vs Non-linear Transformations


.

What is a linear transformation? A linear transformation is a mathematical function that maps a vector space to another vector space in a way that preserves addition and scalar multiplication. This means that the output of the transformation is directly proportional to the input, and there is no bending or curving in the transformation. 

.

What is a nonlinear transformation? A nonlinear transformation is a mathematical function that does not preserve addition and scalar multiplication. This means that the output of the transformation is not directly proportional to the input, and there is bending or curving involved in the transformation. 

.

What are some examples of linear transformations? Some examples of linear transformations include translations, rotations, reflections, and dilations. In mathematics, linear transformations are often represented by matrices, and the most common linear transformations are those that involve multiplication by a constant or addition of a constant. 

.

What are some examples of nonlinear transformations? Some examples of nonlinear transformations include polynomial functions, trigonometric functions, logarithmic functions, and exponential functions. These functions involve operations such as squaring, taking the sine or cosine, or raising to a power other than 1, which results in a nonlinear transformation. 

.

What is the difference between linear and nonlinear transformations? The main difference between linear and nonlinear transformations is that linear transformations preserve addition and scalar multiplication, while nonlinear transformations do not. This means that linear transformations result in straight lines or planes, while nonlinear transformations result in curves or surfaces. Additionally, linear transformations can be represented by matrices, while nonlinear transformations cannot be represented by a single matrix.

.

Reference: https://www.physicsforums.com/threads/difference-between-linear-and-nonlinear-transformation.351908/

Read More

Wednesday, May 29, 2024

Free Plagiarism Checker


.

A plagiarism checker is a program that checks if the words or ideas in a document match what someone else has written before. It looks through the document and compares it to a lot of other things that have been published online, like websites, books, and papers. If it finds parts that are the same as something else, it can tell you that there might be plagiarism, which is when you use someone else's work without giving them credit. This is important for things like school assignments and writing, to make sure the work is original.

.

From a technical perspective, a plagiarism checker will typically flag several types of sentences or content as potential plagiarism:


Direct verbatim copying - This includes taking a sentence or paragraph from another source word-for-word without proper attribution. Even a single sentence copied directly is considered plagiarism.


Close paraphrasing - If the wording of a sentence or passage is very similar to the original source, with only minor changes in phrasing, this can be flagged as unacceptable paraphrasing that amounts to plagiarism. The checker looks for sentence structure, key phrases, and close matches in word choice.


Mosaic plagiarism - This refers to piecing together content from multiple sources, altering a few words here and there, to create the appearance of original work. The plagiarism checker will identify these composite passages as too similar to the original sources.


Ideas or concepts - Even if the wording is not directly copied, if the key ideas, theories, or findings presented are taken from another work without proper citation, this can constitute plagiarism of intellectual property.


The plagiarism checker's algorithms are designed to identify all of these different types of plagiarized content to uphold standards of academic integrity and original authorship.

.

It is possible for two people to coincidentally write content that is similar or even appear nearly identical, without any intentional plagiarism taking place. This can happen when authors independently arrive at the same conclusions, use common phrasing or terminology within a particular field, or describe standard processes or concepts in a similar way. In such cases, the plagiarism checker may flag the content as potentially plagiarized, even though the similarity is purely coincidental. The onus is then on the author to provide context, demonstrate their own independent research and thought process, and show that they did not copy the work of others. As long as proper citations are provided for any referenced sources, unintentional similarity should not be considered plagiarism. Plagiarism checkers have limitations and can flag false positives, so it's important for authors to be able to explain and justify any coincidental overlap in their writing.

.

[1] https://plagiarismdetector.net/

Plagiarismdetector.net is a reliable online tool for detecting plagiarism. It offers a completely free and accurate way to check for copied content. Here are some key features of this plagiarism checker:

Deep Search: Unlike basic plagiarism checkers, this tool performs a thorough analysis. It considers lexical frequencies, word choice, matching phrases, and other important factors.

URL or File Uploading: You can either copy and paste your text or upload a page URL or a file. This flexibility makes it convenient for users.

No Ads, No Word Limit: Plagiarismdetector.net ensures a clean interface without distracting ads. Plus, there’s no word limit, so you can check longer documents.

Multiple Languages Supported: It can detect plagiarism in over 150 languages, including English, German, Arabic, Spanish, Portuguese, French, Italian, Filipino, Russian, Hindi, Malay, and more

.

[2] https://app.grammarly.com/

Grammarly’s plagiarism checker is a powerful tool that ensures the originality of your writing. Here’s how it works:

Comparison to Web Pages and Academic Papers:

When you click the Plagiarism button in Grammarly, it compares your text to billions of web pages and academic papers stored in private databases.

It looks for sentences or paragraphs that have been published elsewhere.

Flagging and Citation Alerts:

Grammarly flags text that may need a citation.

In some cases, it even provides links to the source where matching text was detected1.

Premium Features:

Grammarly’s Premium plagiarism checker goes beyond basic alerts:

It flags specific sentences that require citations.

Provides reference information about the source.

Calculates an overall originality score for your document.

Offers advanced writing feedback and corrections across various dimensions.

Privacy Assurance:

Rest assured, your writing remains private.

Grammarly’s plagiarism checker does not make your content searchable publicly or in any other database.

No other plagiarism checkers will see your text.

.

[3] https://smallseotools.com/plagiarism-checker/

SmallSEOTools’ Plagiarism Checker is a 100% free online tool that detects plagiarism and provides rapid and reliable findings. To use it, simply copy and paste your text into the provided box, then click the blue button labeled “Check Plagiarism.” Within seconds, your article will be scanned for duplicate content. The user-friendly interface ensures a quick and hassle-free experience. Notably, this web-based utility supports multi-platform access, so whether you’re on Android, iOS, Windows, Linux, or Mac, you can easily check for plagiarism without installing any plugins or software. Plus, there are no costs involved, making it an excellent choice for students, teachers, researchers, writers, publishers, and bloggers. Beyond detecting plagiarism, it also provides a list of matching sources, allowing users to verify and cite their work effectively

.

[4] https://www.duplichecker.com/

Duplichecker is a free online plagiarism checker that verifies whether content is partially or fully plagiarized on the internet. It works by analyzing each sentence and comparing it to existing content online. Users can paste text, drop files, or upload documents in formats such as .tex, .txt, .doc, .docx, .odt, .pdf, and .rtf. The tool provides results in percentage, revealing the uniqueness of the content and highlighting any matching sources. Additionally, Duplichecker respects user privacy by not saving uploaded material, ensuring data security and confidentiality

.

[5] https://www.quetext.com/

Quetext is a leading platform for plagiarism detection. It has assisted over 5 million students, teachers, and content writers in fixing writing issues, building citations, and ensuring the originality of their work. Quetext’s deep search technology analyzes text to identify instances of plagiarism, while also providing AI-powered solutions for writing improvement. With an easy-to-use interface and precise results, Quetext is a reliable tool for detecting various types of plagiarism, including paraphrasing. Whether you’re a student or a professional writer, Quetext helps you maintain the integrity of your content

.

[6] https://www.paraphraser.io/plagiarism-checker

Paraphraser.io’s Plagiarism Checker is a valuable online tool that scans your content for plagiarism. Whether you’re a student, professional writer, or blogger, this tool ensures the authenticity of your work. Here are its key features:


In-Depth Checking: Paraphraser.io employs advanced AI technology to perform an in-depth search for similarities and duplication across online sources. Its robust databases delve into vast libraries on the internet, fetching original and authentic material.

Accuracy in Results: Unlike magic tricks, this plagiarism checker provides authentic results in real-time. It doesn’t falsely identify unreasonable duplication; instead, it focuses on precision.

Free to Use: The best part? It’s completely free! You can scan your files for plagiarism without any cost. Just visit the Paraphraser.io Plagiarism Checker and start using it.

Multiple Input Options: Along with copy-pasting, you can upload URLs or files for a speedy check. It’s quick, efficient, and helps you maintain the integrity of your content.

.

[7] https://papersowl.com/free-plagiarism-checker


PapersOwl’s plagiarism detection tool provides all the essential information you need to address plagiarized content. Whether you unintentionally fell victim to plagiarism or borrowed text from various sources, this tool delivers an accurate percentage through its online plagiarism checker. Simply copy and paste your text into the platform, and it swiftly analyzes your work, offering a uniqueness percentage, identifying sources, and even suggesting a “Make It Unique” button for rewriting. It’s a convenient and reliable solution for maintaining academic integrity and ensuring originality in your writing
.

[8] https://www.customwritings.com/howtowrite/plagiarism-checker/

CustomWritings.com offers a plagiarism checker to ensure the originality of your work. You can insert your text for analysis (available in English only), and the tool will compare it against its database. If any similarities are found, it will highlight them, allowing you to make necessary changes.


.


Read More

Monday, May 13, 2024

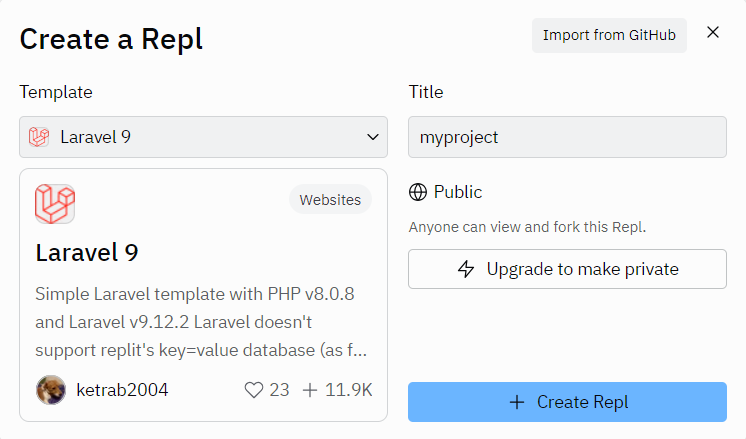
How to create PHP Laravel project on Replit platform?

.

To create a PHP Laravel project on Replit, follow these steps:

  1. Visit the Replit website at https://replit.com/ and log in to your account. If you don't have an account, you can create one for free.
  2. Once you're logged in, click on the "New Repl" button on the top-right corner of the page.
  3. In the pop-up window that appears, type "Laravel" in the search box.
  4. Select the "Laravel ... " option from the list of templates.
  5. Click on the "Create Repl" button. Replit will create a new repl with the PHP Web Server template.

.


Read More

How to create PHP Web project on Replit platform?


.

To create a PHP Web project on Replit, follow these steps:

  1. Visit the Replit website at https://replit.com/ and log in to your account. If you don't have an account, you can create one for free.
  2. Once you're logged in, click on the "New Repl" button on the top-right corner of the page.
  3. In the pop-up window that appears, type "PHP Web" in the search box.
  4. Select the "PHP Web Server" option from the list of templates.
  5. Click on the "Create Repl" button. Replit will create a new repl with the PHP Web Server template.

.
 

Read More

How to create PHP CLI project on Replit platform?


.

To create a PHP CLI project on Replit, follow these steps:

  1. Visit the Replit website at https://replit.com/ and log in to your account. If you don't have an account, you can create one for free.
  2. Once you're logged in, click on the "New Repl" button on the top-right corner of the page.
  3. In the pop-up window that appears, choose "PHP" as the language for your repl.
  4. Select the "CLI" option from the list of templates. This will set up a Command Line Interface (CLI) project using PHP.
  5. Click on the "Create Repl" button. Replit will create a new repl with the PHP CLI template.
  6. You will now see the code editor where you can start writing your PHP CLI application. By default, there will be a simple "Hello, World!" example in the editor.
  7. Modify the code according to your requirements. You can add your PHP CLI application logic, functions, classes, and any other necessary code.
  8. To run your PHP CLI application, click on the green "Run" button located at the top of the editor. Replit will execute your PHP code in the terminal and display the output.
  9. You can interact with your PHP CLI application through the terminal. Enter any input required by your application and observe the output.

.


Read More

What is Replit?

.

Replit is an AI-driven software creation platform that allows users to build, share, and ship software quickly. 

It provides a collaborative environment where multiple users can work together on code, review and debug code, and leave comments for efficient collaboration. 

Replit also offers Replit AI, which uses artificial intelligence to assist with tasks such as code generation, debugging, and autocomplete. 

With Replit Deployments, users can easily launch production-ready applications. 

Replit aims to empower software creators and provide them with the tools they need to bring their ideas to life.

.

Read More